




You can have the right pole, the right brush, and a clean-looking setup on the truck, then still walk up to a Scottsdale house and leave the first panes with film and spotting. That's the part new crews don't expect, the hardware is assembled, but the system isn't ready to clean yet. In the field, the difference usually comes down to water purity, pressure stability, hose sizing, brush technique, and the way the frame is handled before the rinse.
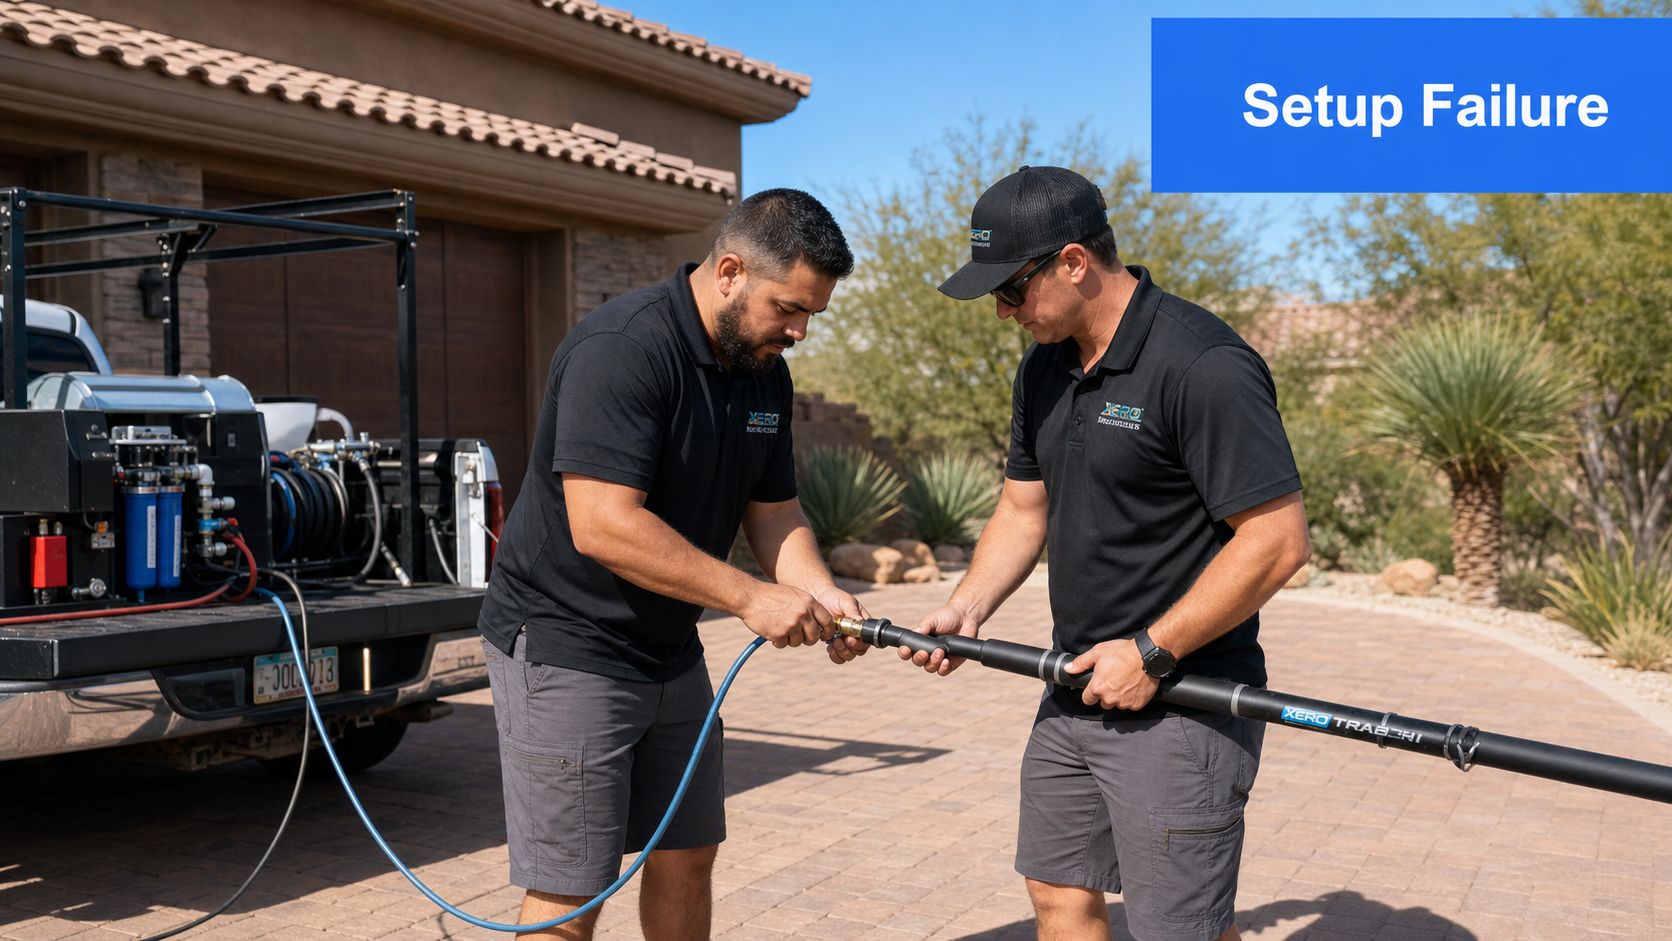
A solid water fed pole set up isn't about buying the fanciest gear. It's about removing weak links before they show up on glass, especially on jobs in places like Phoenix, Denver, and Las Vegas where crews deal with heat, wind, and hard-water conditions that punish sloppy prep. That's why professional crews standardize their process and train technicians to check the system the same way every time, before a single window gets touched.
Why Your Water Fed Pole Setup Determines Cleaning Results
A crew can roll up to a residential job in Scottsdale with brand-new brushes, a clean truck, and a pole rig that looks ready to work, then still leave streaks on every pane if one part of the setup chain is off. Pure water work punishes small mistakes. The glass does not care that the equipment is expensive, only what reaches the pane and how it gets there.
The system works because every part supports the next one. Purified water, stable flow, proper hose sizing, and controlled brush work all have to line up. If the hose chokes the flow, the pole surges when it starts, or the brush leaves contamination in the frame, the rinse is already compromised before the first pass dries.
Practical rule: If the glass spots, do not assume the pole failed. Check the water, the pressure, the frame, and the rinse pattern before blaming the hardware.
A setup can still fail even when the pole is assembled correctly. If the water is not pure enough, the glass can dry with residue instead of clearing cleanly, and if pressure is not steady, the rinse pattern becomes uneven from the first stroke to the last. Crews also lose time when they have to keep reworking frames, especially if dirty edges keep feeding soil back onto the glass after the brush has already done its job.
Modern water-fed pole systems let cleaners work from the ground while reaching substantial height. Professional setups clean windows up to 90 feet high, while another source notes commonly cited working ranges of 60 to 70 feet depending on design and conditions, and the same source says ladder use can be cut by about 80% on residential jobs and job completion time can drop by up to 40% versus traditional squeegee methods (water-fed pole overview). Those advantages only show up when the setup is right. A weak setup wastes the one thing pure-water systems are supposed to save, time.
One of the biggest misses is frame contamination. The brush can rinse the pane properly and still leave spotting if loose debris, oxidized trim, or old soap residue gets pulled down from the top seal and corners. That is why crews need to treat the frame as part of the cleaning path, not as background detail. A good setup does not just deliver water, it controls where the dirt goes and how much of it comes back to the glass.
The difference shows up fast on real jobs. A clean-looking rig with poor water quality or unstable flow gives you false confidence, while a plain setup that is tuned correctly usually finishes cleaner and faster than a flashy one that was never checked at the start of the day. That is why experienced crews slow down before the first window, verify the system, and make sure the rinse is working before they trust the pole on the glass.
water-fed pole hose setup guide
Essential Components for a Professional Water Fed Pole System
A proper system starts with knowing what each part does. Crews in Phoenix and Denver tend to standardize their gear because field failures usually come from mismatched hoses, worn fittings, or a brush choice that doesn't fit the water and glass conditions. The goal is a setup you can trust before the truck leaves the yard.
| Water Fed Pole Component Overview | ||
|---|---|---|
| Component | Function | Pre-Job Check |
| Pole sections | Reach the glass while keeping the operator on the ground | Inspect locks, joints, and wear before extending |
| Brush head | Agitates dirt and frames so pure water can rinse it away | Check bristles, rinse behavior, and secure mounting |
| Supply hose and reel | Delivers water from the source to the pole | Look for kinks, leaks, and hose size mismatch |
| Quick-connect fittings | Make the pole connection fast and secure | Confirm tight fit and no grit in the coupling |
| RO/DI filtration or tank | Produces purified water for spot-free drying | Verify filtration status and water output |
| TDS meter | Confirms water purity before cleaning | Test output before touching glass |
Choosing the right pole, hose, and brush
Pole material affects how the day feels on the job. Carbon fiber is the lighter choice for longer reach and less fatigue, while hybrid poles can be a practical middle ground when crews want durability without going all-in on the most expensive build. Either way, the pole has to lock cleanly and hold alignment under load.
Brush choice matters just as much. Synthetic brushes are common and forgiving, but they don't behave exactly like natural fiber on rinse. 100% boar's hair needs a more deliberate rinse off the glass, which many new operators miss, and that difference can make a system look “bad” when the issue is technique.
The hose and reel matter because undersizing costs you flow. Practical setup guidance points to a 3/4-inch or 5/8-inch garden hose feeding the system, and the same workflow uses a 5/16-inch quick-connect at the pole end (hose guidance). A proper hose doesn't just move water, it keeps the system from starving when demand rises.
Field note: A clean-looking setup can still fail if the fittings are loose. A tiny leak or a poor connection often shows up as uneven flow long before anyone notices the drip.
Assembling the Pole and Connecting Your Water Source
Start at the water source, not at the pole. Connect the 3/4-inch or 5/8-inch garden hose to the supply, route it through the reel and outlet plumbing, then pressurize the line before attaching the pole. That order lets the hose fill, steadies the flow, and shows you whether the system is moving water cleanly before the brush touches glass (setup sequence).
A lot of bad results start here, even when the pole sections are assembled correctly. If the line is not fully charged, flow can surge and fall off at the brush head, which makes rinsing uneven and leaves the operator guessing about the problem. The pump side matters too, so if the system uses one, check the water fed pole pump before you climb into the work.
The connection at the pole end should be tight and clean. A 5/16-inch quick-connect is where leaks and flow loss often begin, usually because the fitting was not seated fully or grit got into the coupling. Turn the water on before the pole is attached, and watch the connection while you can still fix it on the ground.
The hidden problem is often contamination, not assembly. A clean-looking hose can still carry grit, old soap, or debris from the frame area into the rinse path, and that contamination shows up as streaking or stubborn spotting even when the hardware is connected correctly. I wipe fittings, check the hose end, and make sure the water is flowing steady before I assume the pole is the issue.
What changes with long poles
Once you get into longer reach, control matters more than speed. Guidance for poles over 10 metres, or 35 feet, says to raise them vertically one section at a time while the brush rests on the fascia, because lifting them off-angle increases control loss and fatigue (pole handling guidance). That is not a small detail, it is the difference between a stable stroke and a pole that wants to whip around in the wind.
A long pole also changes the safety picture. In Arizona and Colorado, wind can turn a light touch into a fight, and overhead power lines change the whole job. If the pole starts feeling twitchy, stop reaching and reset your stance instead of muscling through it.
The common setup mistakes are predictable. An undersized supply hose, a loose quick-connect, starting with the pole already attached before the line is primed, or letting pressure pulse at the source all create unstable flow. The fix is boring, but boring is what works on job sites.
Testing Water Quality and TDS Thresholds for Spot-Free Glass
Purified water isn't just “clean enough.” It has to be low enough in dissolved solids to dry clear on glass, and that's where a lot of new setups fall apart. One instructional source says to wait about 90 seconds after starting the system, then check the output with a TDS meter and keep the reading under 10 ppm before using the water on glass (TDS guidance).
What the meter is telling you
A low reading tells you the water is ready, but it doesn't tell you why it might be drifting. If TDS creeps up, the first things to look at are DI resin exhaustion, membrane degradation, and changes in the source water. Those are the usual causes when the setup looks correct but the rinse starts leaving faint marks.
Here's the part that trips people up. Low TDS is necessary, but not always sufficient. You can have water under the threshold and still end up with spots if the frame is dirty, the brush is loaded with contamination, or the rinse technique is sloppy. That's why water quality and operator technique have to be separated in your head.
Reading poor results correctly
Hard-water markets make this more obvious. In places like Phoenix, Las Vegas, and Denver, RO/DI systems are under more strain because the incoming water is harder to tame, so resin replacement and filtration checks become part of routine work, not emergency work. If the water tests good at the outlet but the glass still looks wrong, the problem may be contamination on the frame or a rinse that never properly sheets.
Useful habit: Test the water before the first pane, not after the first complaint. By then you've already wasted time guessing.
If you want the water side of the system to behave consistently, the rest of the setup has to match it. The same holds for choosing detergents on jobs where pure water isn't the only method in play, so it's worth keeping your chemistry choices aligned with professional glass care, not generic household products (window cleaning solution guidance).
Brush Technique and Cleaning Patterns That Actually Work
A good setup can still produce ugly glass if the brush work is lazy. The cleanest results come from a repeatable pattern, scrub the top portion first, then work the rest of the pane while leaving the top 2 to 3 inches untouched on the second pass so rinse water can sheet downward and carry loosened contamination off the glass (brush technique guidance).
The pattern that keeps dirt moving the right way
Work in 2-foot-wide sections instead of wandering across the whole window. Hold the pole at roughly a 45-degree angle to the glass, clean the frame and pocket before the main rinse, then let the water run in a controlled sheet. That order matters because the frame is often where the worst contamination lives, and dragging that dirt onto a clean pane defeats the purpose of the rinse.
Brush type changes the whole feel of the rinse. A synthetic brush and a 100% boar's hair brush don't shed water the same way, and boar's hair usually demands a more careful rinse off the glass. New operators often swap brushes and expect the exact same result, then blame the pole when the issue is that the rinse technique changed with the brush.
Long poles need a different body position
Longer poles punish bad posture. Once the pole gets past 35 feet, the top section should be raised vertically one section at a time with the brush resting on the fascia, because off-angle lifting increases control loss and operator fatigue (pole handling guidance). That's especially true on windy commercial jobs where the pole starts acting like a sail.
A crew trained on these patterns works faster because they're not fighting the tool. That's why professional companies in Tempe, Boulder, and Chandler spend real time on brush path, rinse timing, and how the pole feels at height. The hardware only pays off when the stroke is disciplined.
Troubleshooting Poor Results When Your Setup Seems Correct
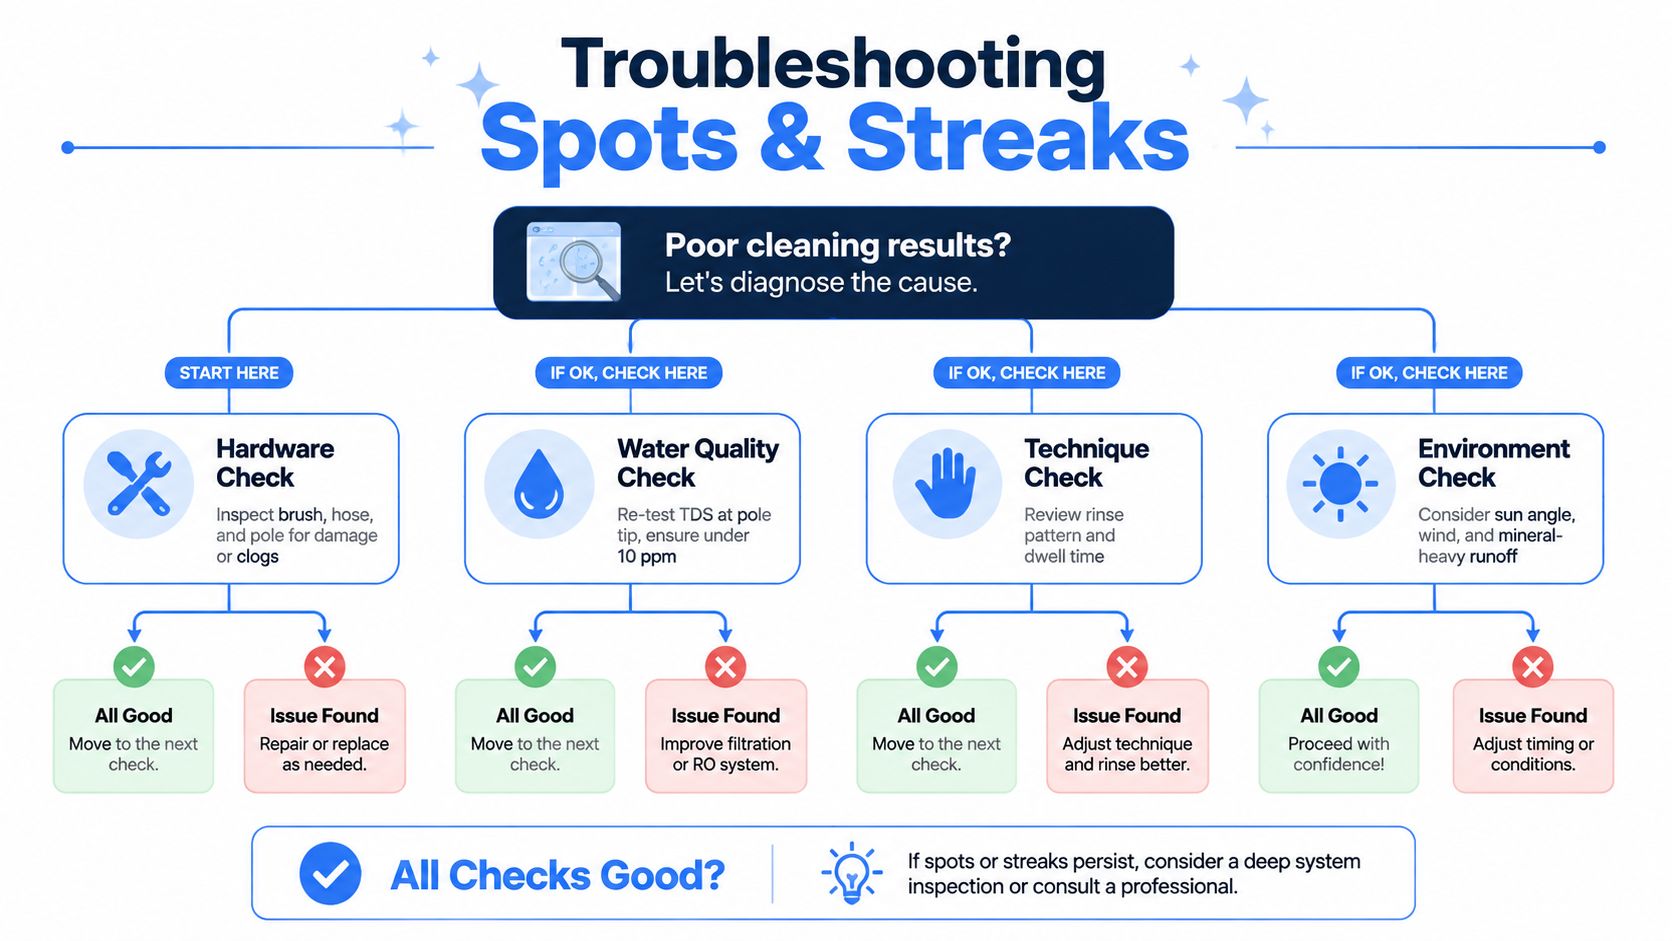
The most frustrating call is the one where everything looks right, the TDS reads fine, and the glass still comes out spotted or streaky. That usually means the problem isn't one thing, it's a chain issue that only shows up under load. The right response is to isolate the fault instead of changing three variables at once.
Start with the hardware, then the water, then the technique
If the brush is damaged, clogged, or loaded with grit, the rinse will leave junk behind no matter how pure the water is. If the hose or pole has a leak or restriction, flow at the tip won't match what the meter suggested earlier. After that, check the technique, especially brush angle and rinse dwell time.
Frame contamination is another common miss. Dirt that stays in the frame can drip back onto glass after the main rinse, which makes a clean pane look dirty minutes later. That's not a water purity problem, it's a prep problem.
Don't ignore the brush and the environment
Brush choice matters again here. Switching from synthetic to boar's hair, or the other way around, changes how the rinse behaves and how much water it takes to clear the pane. If the flow looks fine but the finish looks cloudy, check whether the brush style matches the way you're rinsing.
Environment matters too. Sun angle, wind, and mineral-heavy runoff can all make good work look worse than it is. The point is to diagnose, not guess.
Maintenance Routines and Professional Service Options
Daily care is simple, and it saves jobs. Flush the hoses, rinse the brushes, and check quick-connects for grit before the system goes back on the truck. Weekly, look at the hose for kinks and UV wear, and verify the TDS meter is still trustworthy. Seasonal tasks are the bigger ones, like replacing DI resin, checking the RO membrane, and winterizing systems in Colorado and Flagstaff before freezing weather shows up.
Store poles so they don't get bent, crushed, or dragged across sharp edges. Carbon fiber doesn't like abuse, and a damaged section can ruin the feel of the whole setup. Brush heads need care too, because weak agitation turns a solid system into a mediocre one.
For homeowners and property managers, there's a clear line where professional help makes more sense than DIY. Multi-story buildings, skylights, and commercial glass are better handled by trained crews with OSHA 1910.27 training, rope descent systems, and boom lifts, especially when access or safety is complicated. Professional Window Cleaning serves Arizona, Colorado, and Nevada, including local service areas like Phoenix, Scottsdale, Tempe, Chandler, Denver, Boulder, and Las Vegas.
If you want your next water fed pole set up to work the first time, not just look right on the truck, Professional Window Cleaning can handle the glass with the right access, the right equipment, and a crew that knows how to avoid the setup mistakes that leave spots behind. Visit Professional Window Cleaning to schedule service or compare options for your home, building, or property.